If your database is hosted on Amazon RDS in a private VPC without public access, you can use AWS PrivateLink to securely connect it to PushMetrics. Traffic stays entirely within the AWS network and never traverses the public internet.
How it works
AWS PrivateLink creates a private connection between your VPC and the PushMetrics VPC. You expose your RDS instance through an internal Network Load Balancer (NLB), and PushMetrics connects to it via a VPC Interface Endpoint.

Prerequisites
- Your RDS instance must be in the eu-central-1 (Frankfurt) region — the same region as PushMetrics.
- You need an AWS account with permissions to create NLBs, Target Groups, VPC Endpoint Services, and (optionally) Lambda functions.
- PushMetrics AWS Account ID: 133737826969 (you will need this to whitelist our account).
Setup steps (your AWS account)
Step 1: Gather your RDS details
Before starting, collect the following information from the AWS Console:
- Go to RDS → Databases and select your database instance.
- On the Connectivity & security tab, note:
- Endpoint: the RDS hostname (e.g.,
your-db.xxxxxx.eu-central-1.rds.amazonaws.com) - Port: the database port (typically
5432for PostgreSQL or3306for MySQL) - VPC: the VPC ID where the RDS instance is deployed
- Subnets: click on the Subnet group to see which subnets the RDS instance uses
- Endpoint: the RDS hostname (e.g.,
- On the same page, note the VPC security group ID attached to the instance — you will need to add inbound rules to it later.
You will use these values throughout the remaining steps.
Step 2: Resolve the RDS private IP
From within your VPC (e.g., an EC2 instance, EKS pod, or AWS CloudShell), resolve the private IP address of your RDS instance:
nslookup your-db.xxxxxx.eu-central-1.rds.amazonaws.com
Note the IP address from the output. This must be resolved from inside the VPC — public DNS resolution returns a different address.
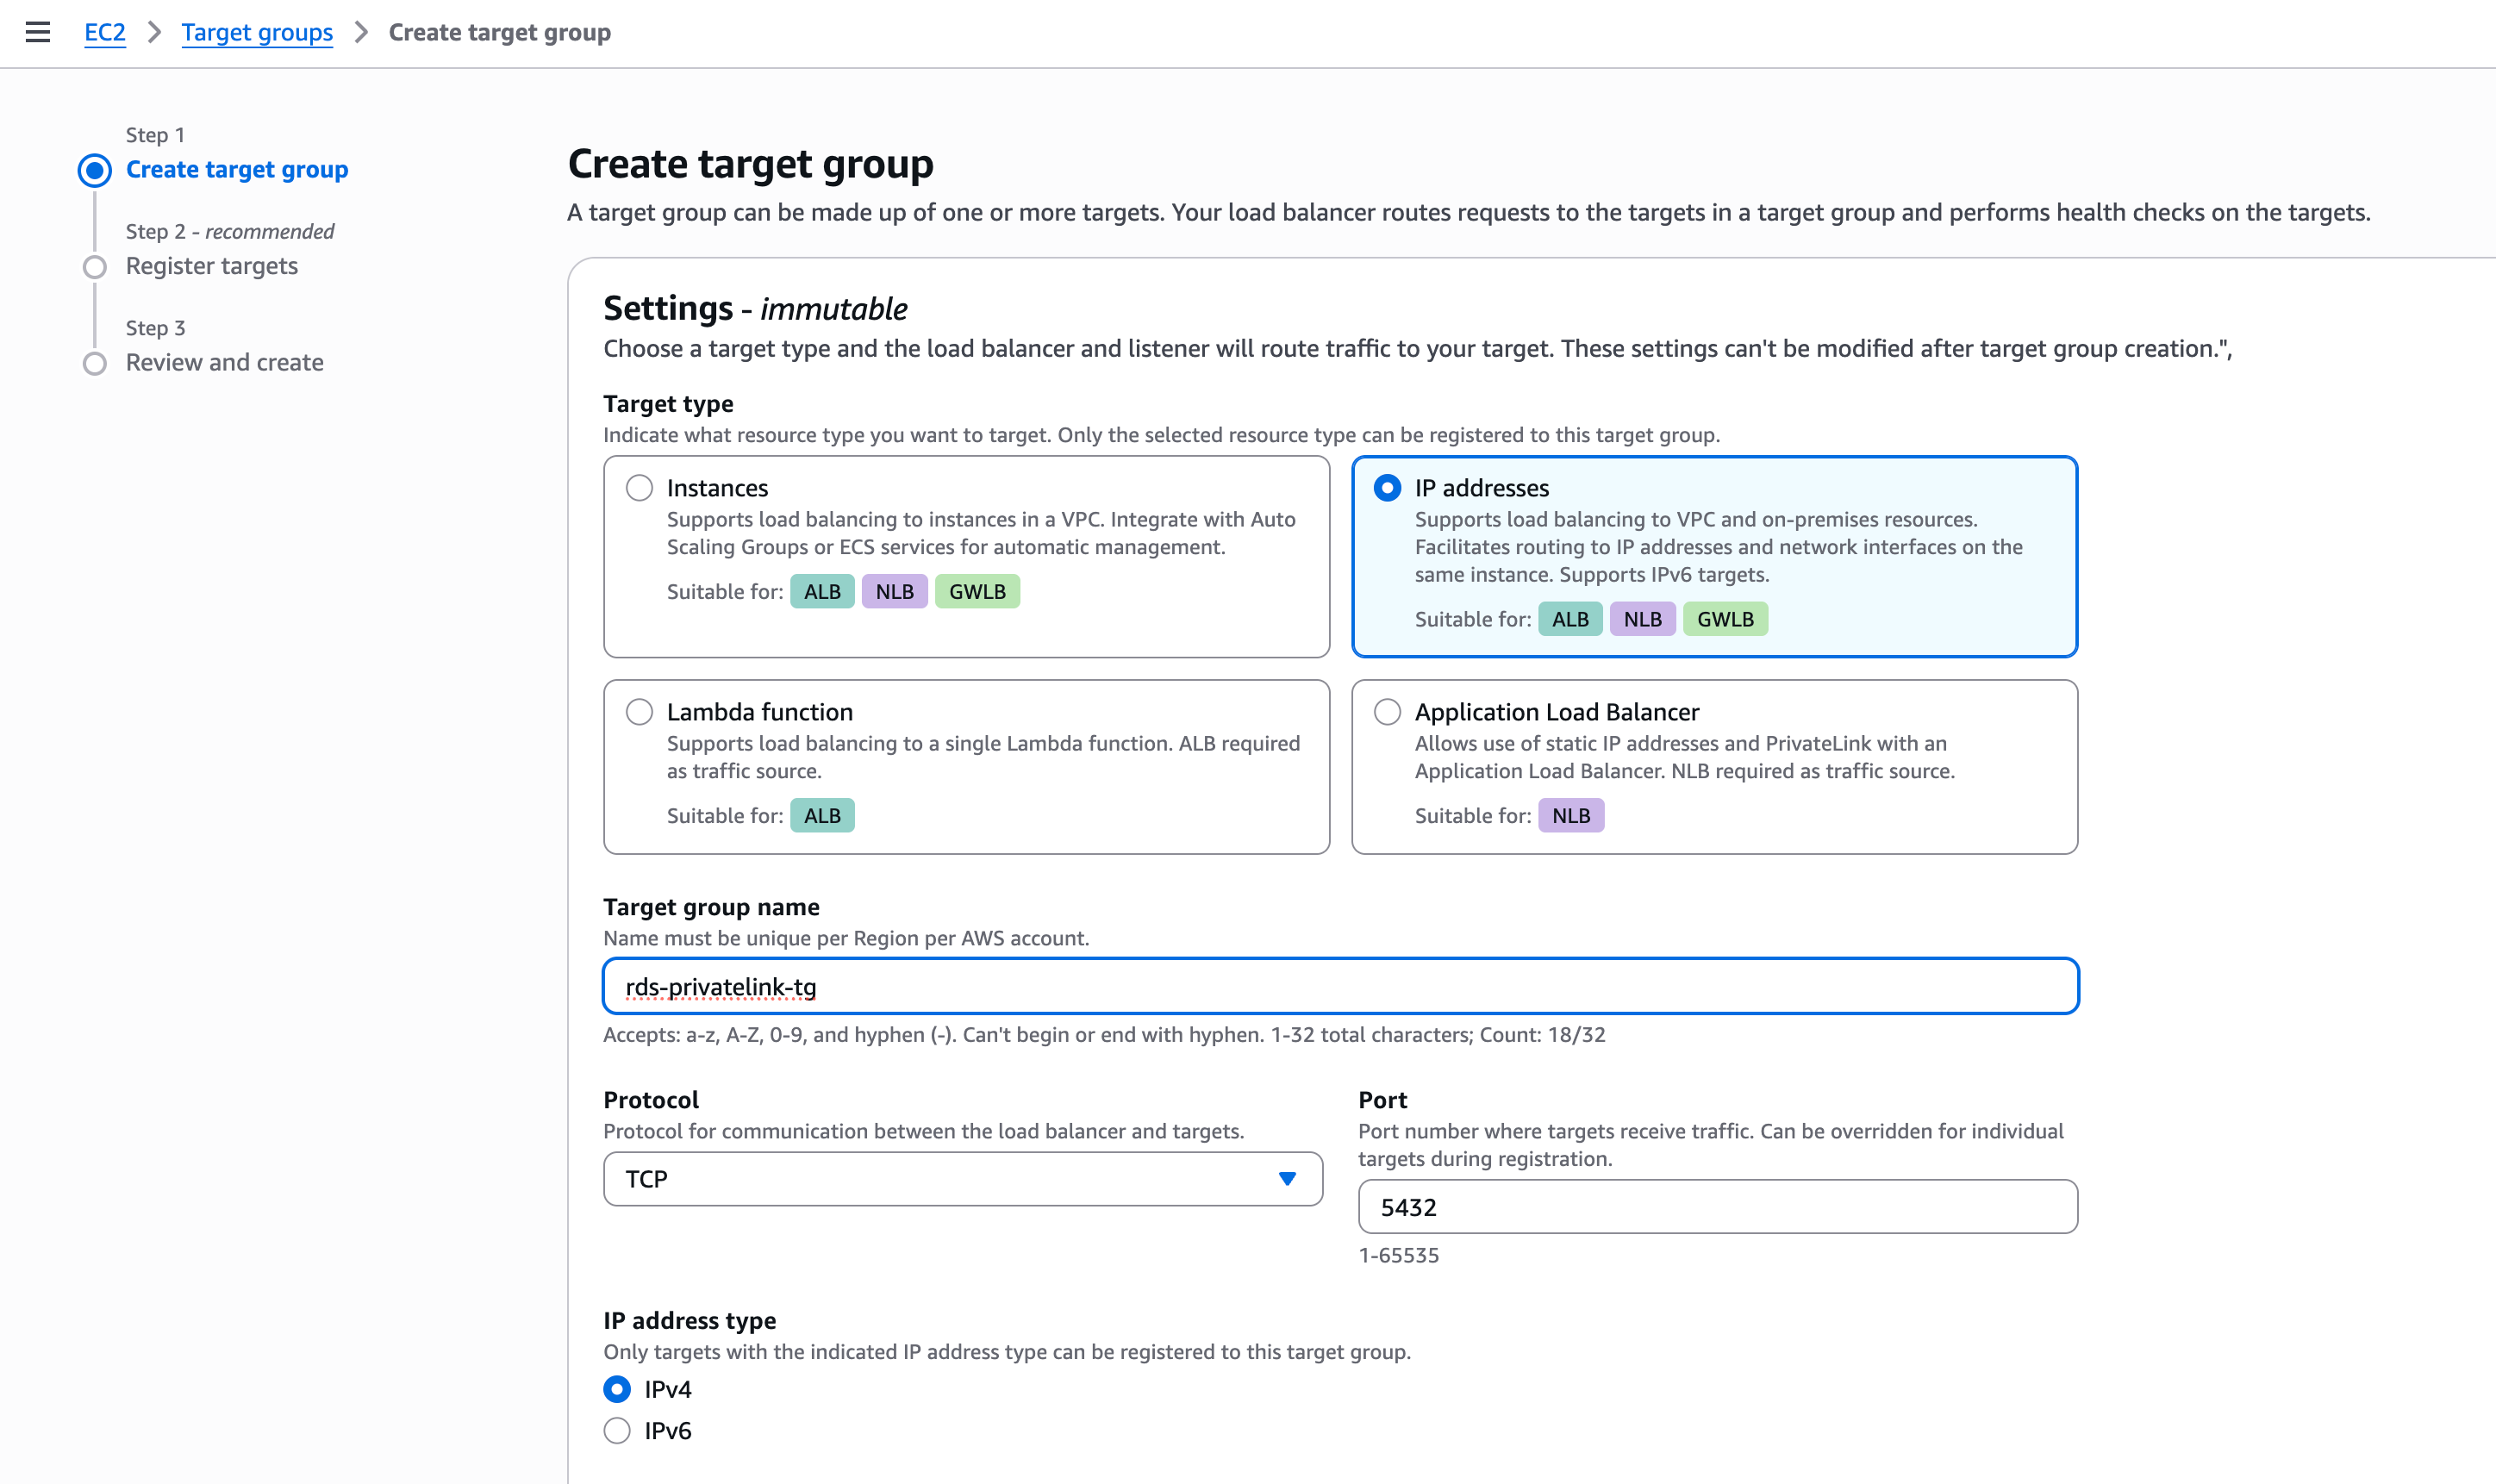
Step 3: Create an NLB Target Group
- In the AWS Console, go to EC2 → Target Groups → Create target group.
- Configure:
- Target type: IP addresses
- Name: e.g.
rds-pushmetrics-tg - Protocol: TCP
- Port: 5432 (or your database port)
- VPC: the same VPC as your RDS instance (from Step 1)
- Health check protocol: TCP
- Register the RDS private IP from Step 2 as a target.
- Click Create target group.
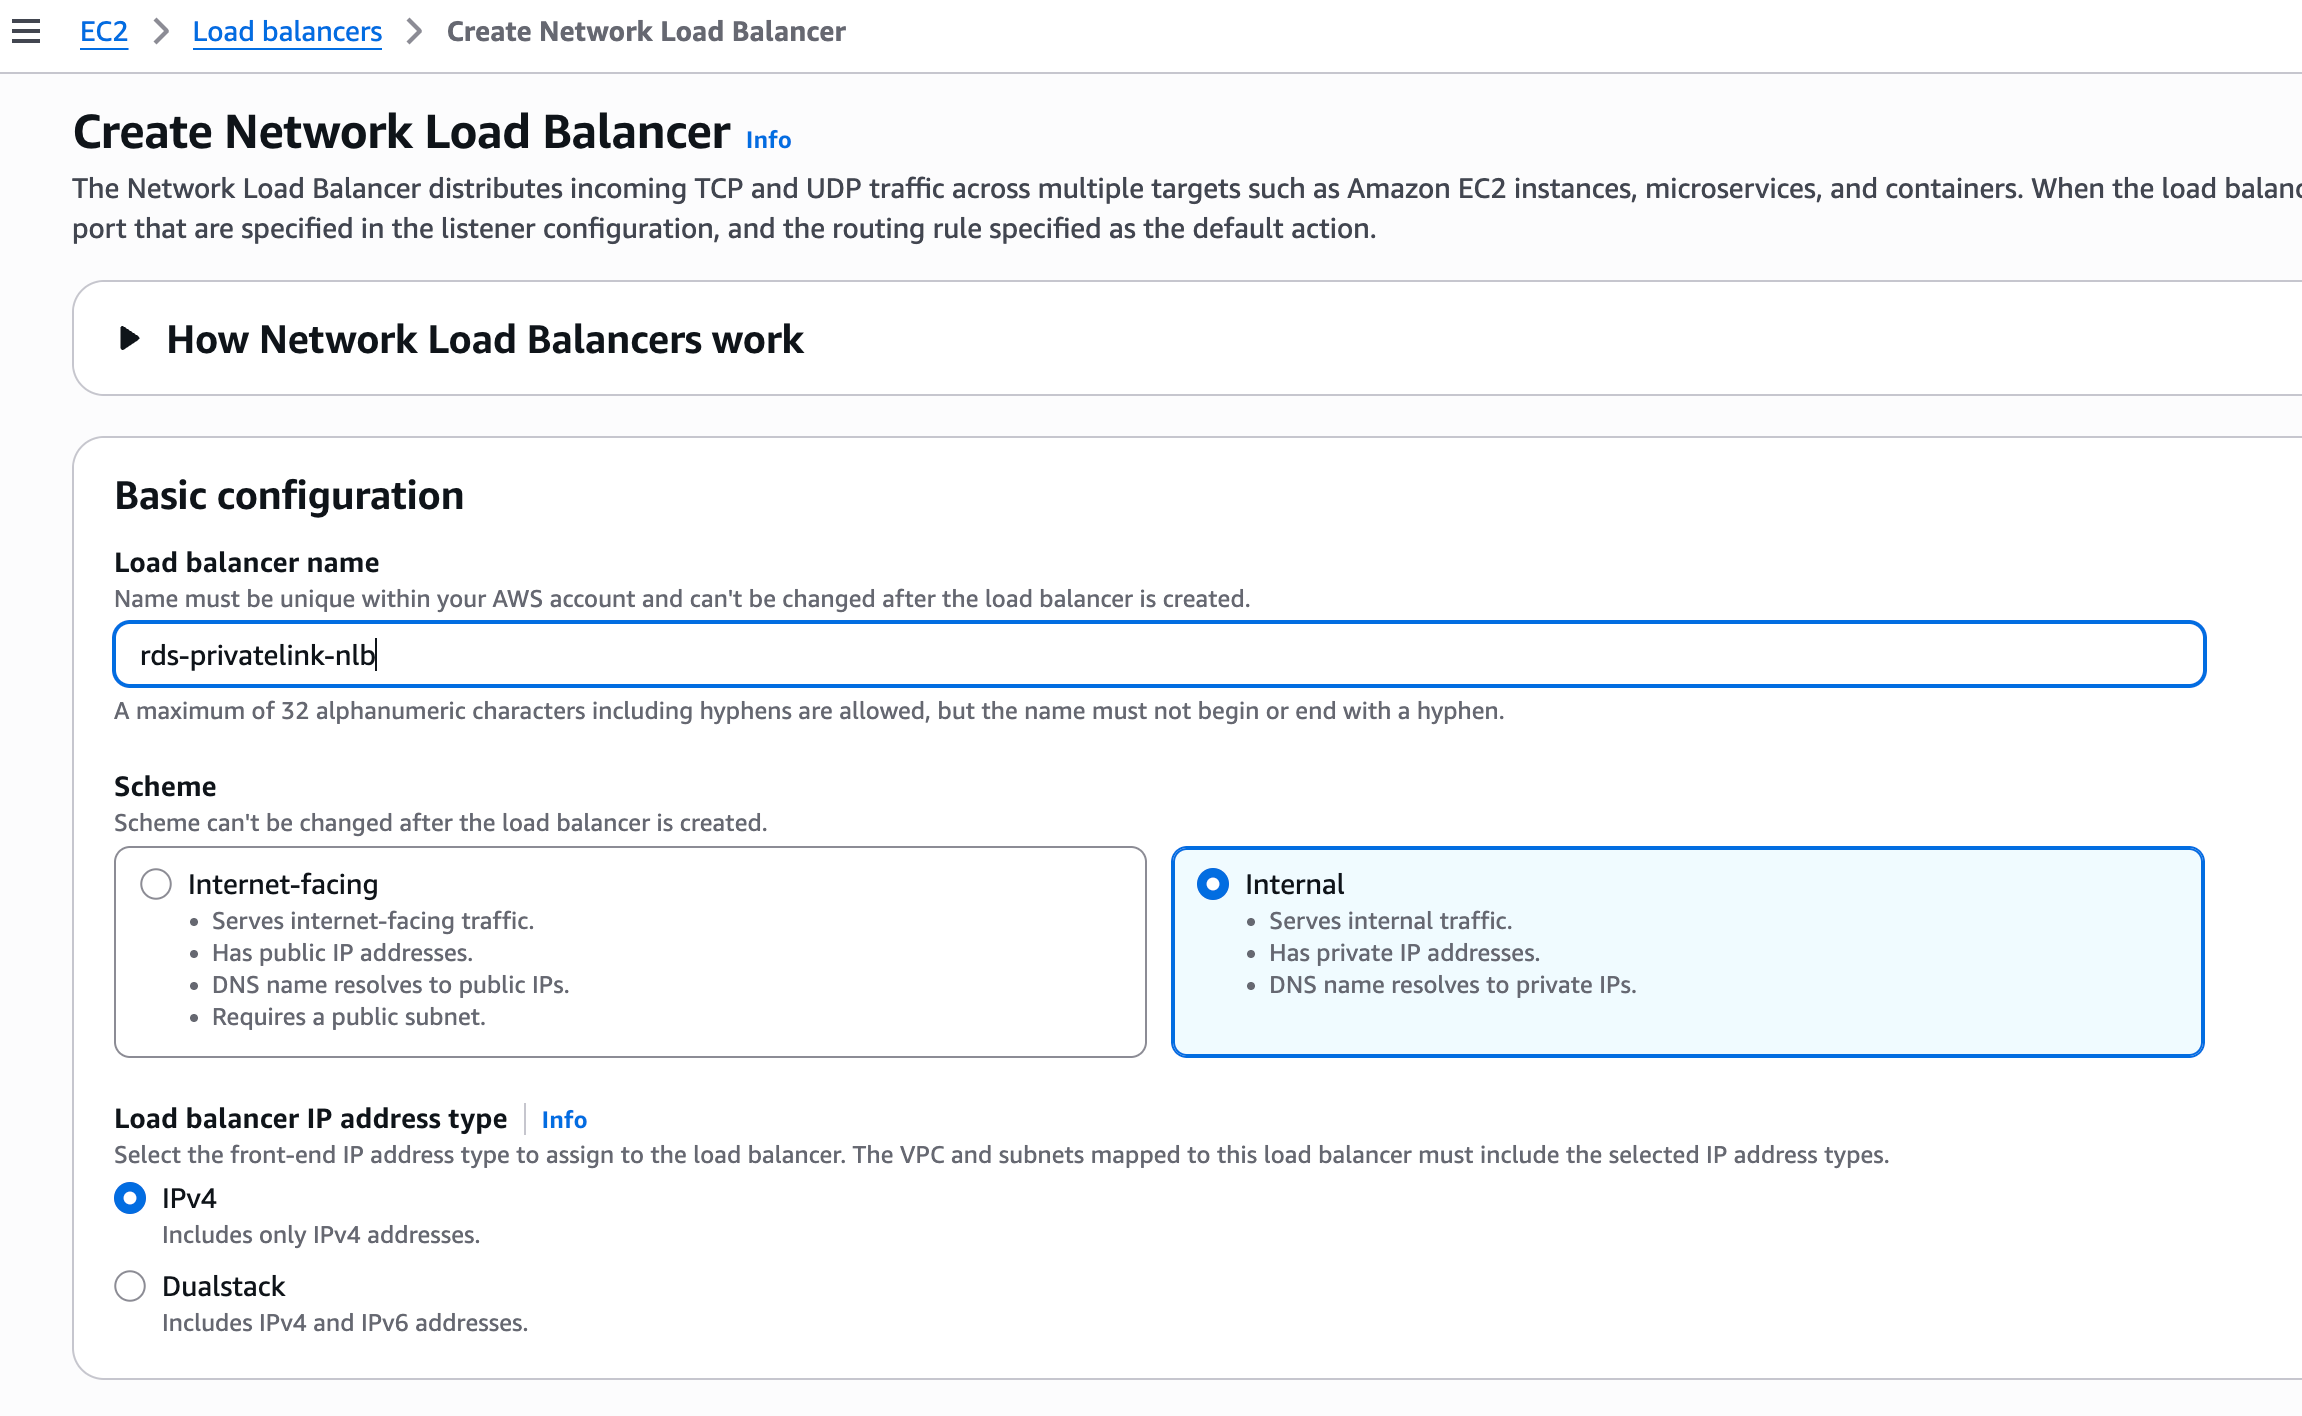
Step 4: Create an Internal Network Load Balancer
- Go to EC2 → Load Balancers → Create Load Balancer → Network Load Balancer.
- Configure:
- Name: e.g.
rds-pushmetrics-nlb - Scheme: Internal (this is required — do not use internet-facing)
- VPC: the same VPC as your RDS instance
- Subnets: select private subnets in the availability zones where your RDS instance may reside
- Listener: TCP on port 5432, forwarding to the target group created in Step 3
- Name: e.g.
- After creation, enable cross-zone load balancing:
- Select the load balancer → Attributes → Edit → Enable Cross-zone load balancing
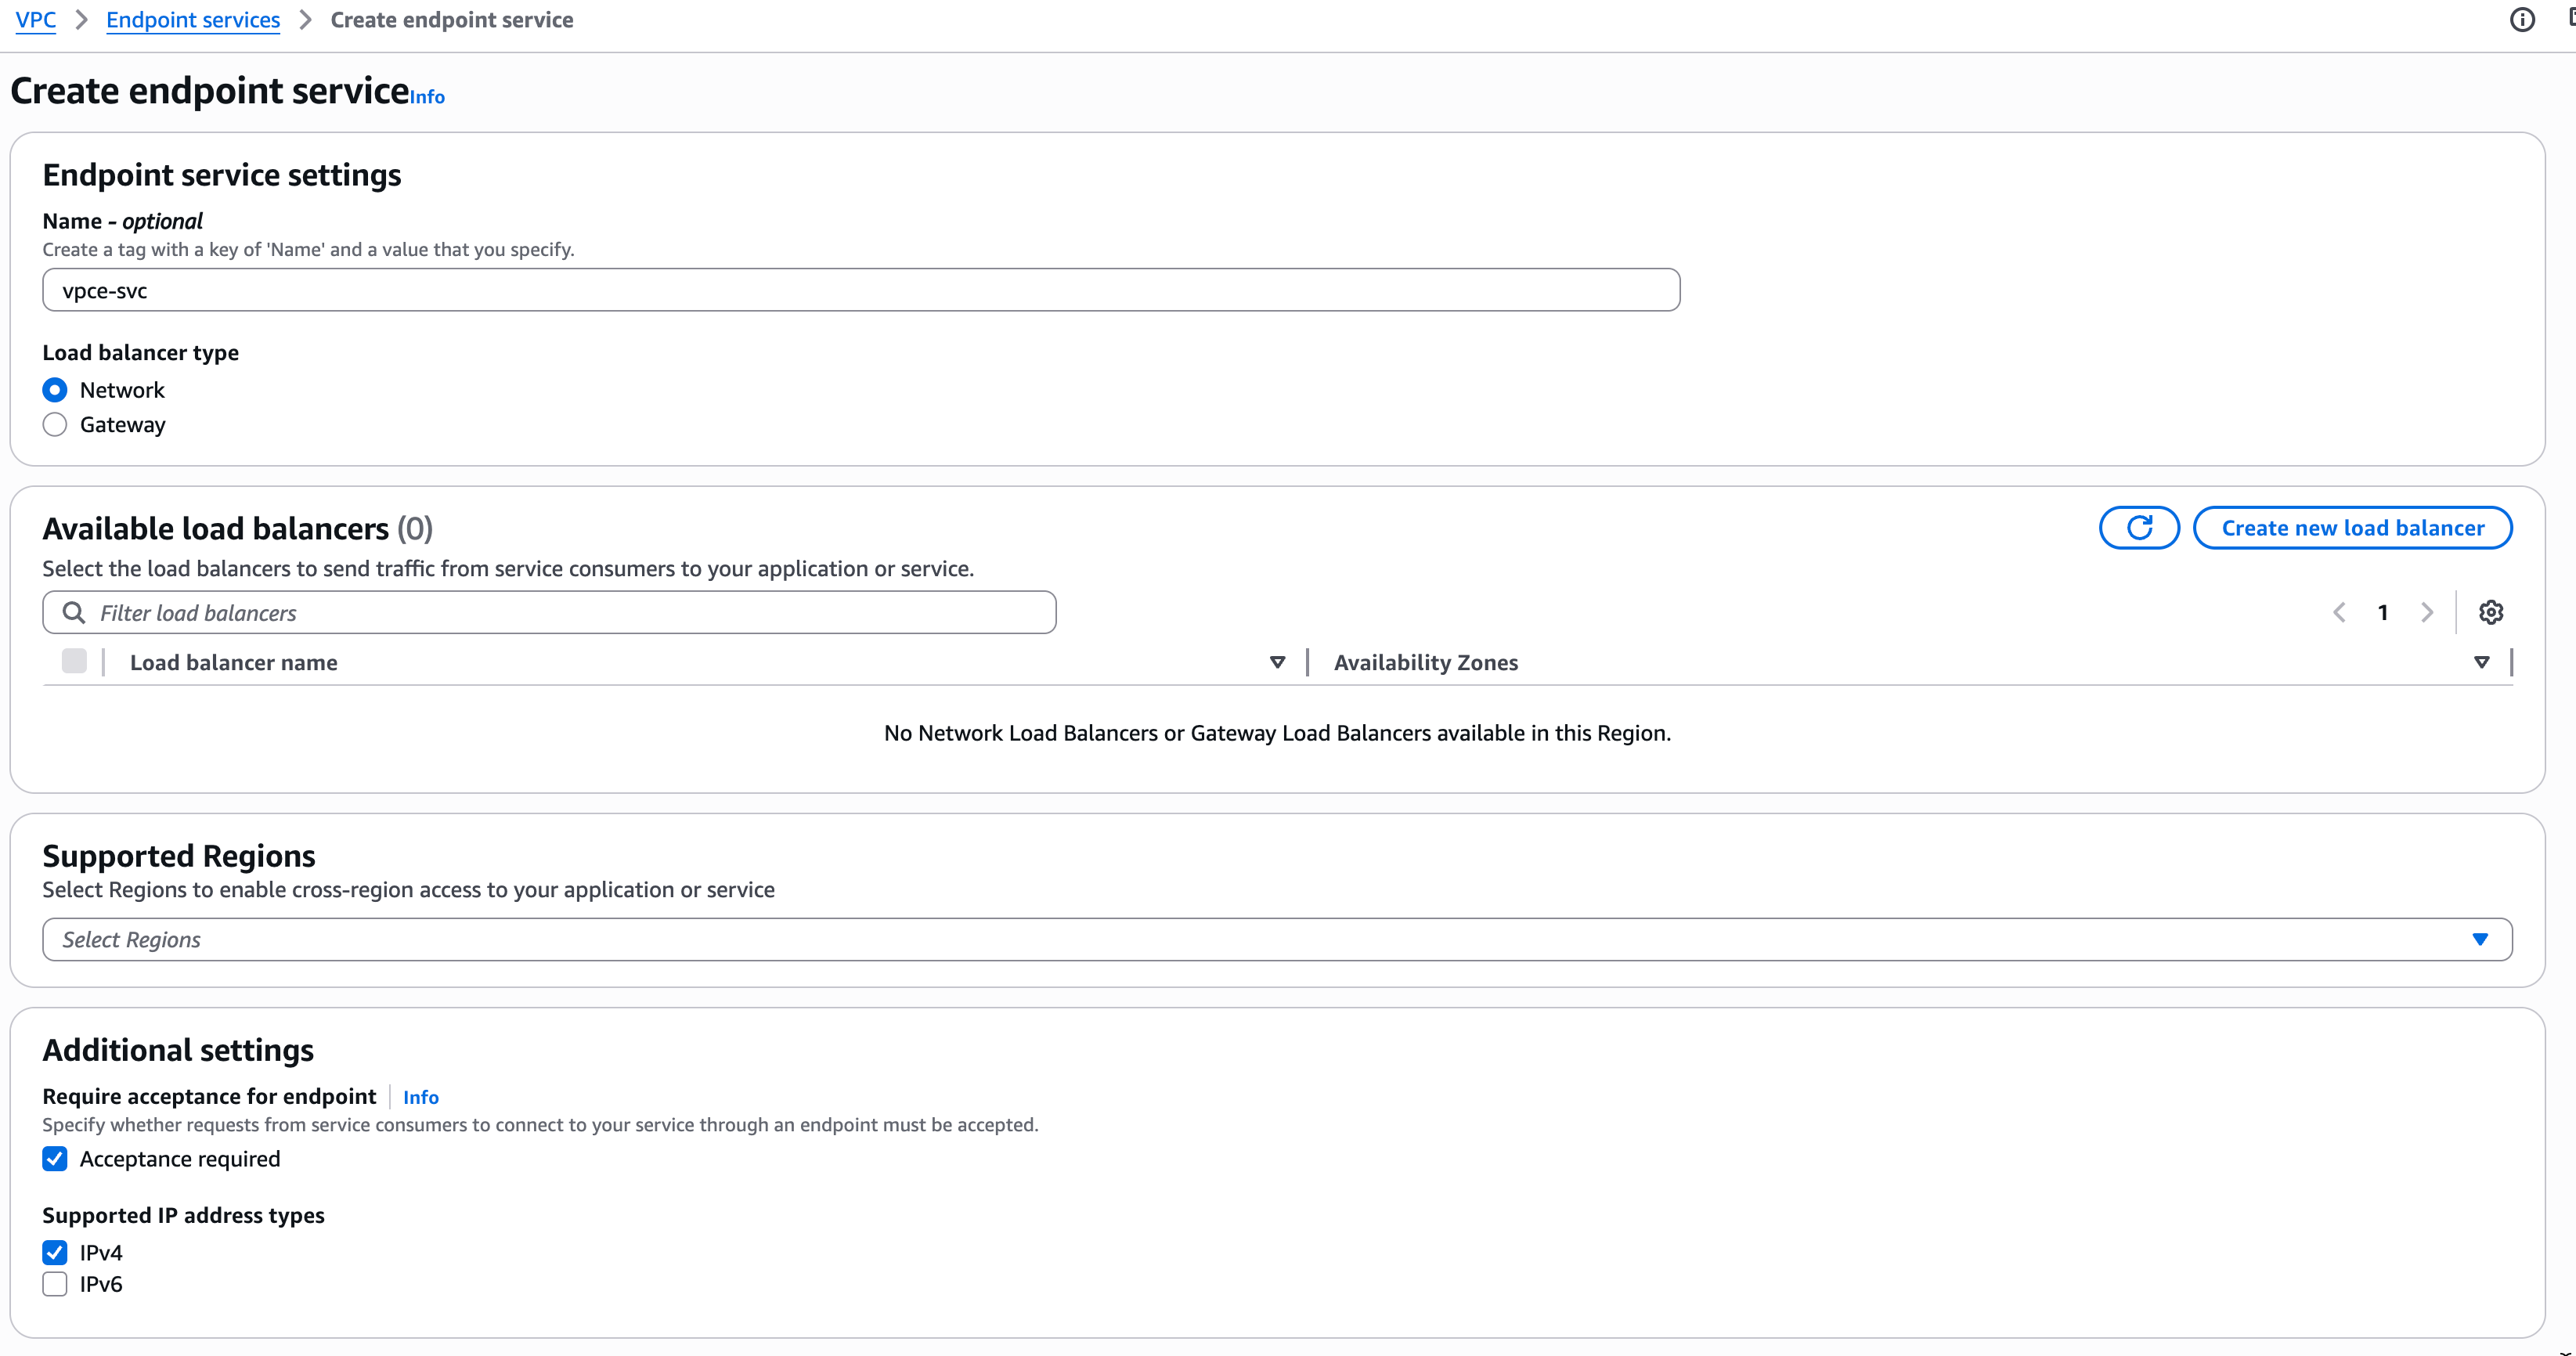
Step 5: Create a VPC Endpoint Service
- Go to VPC → Endpoint services → Create endpoint service.
- Configure:
- Load balancer type: Network
- Select the NLB created in Step 4
- Check Require acceptance for endpoint (recommended — gives you control over who connects)
- Click Create.
After creation, you need to find the Service name to share with PushMetrics:
- Go to VPC → Endpoint services and select the service you just created.
- On the Details tab, copy the Service name (e.g.,
com.amazonaws.vpce.eu-central-1.vpce-svc-xxxxxxxxx). - Keep this value — you will share it with PushMetrics in Step 8.
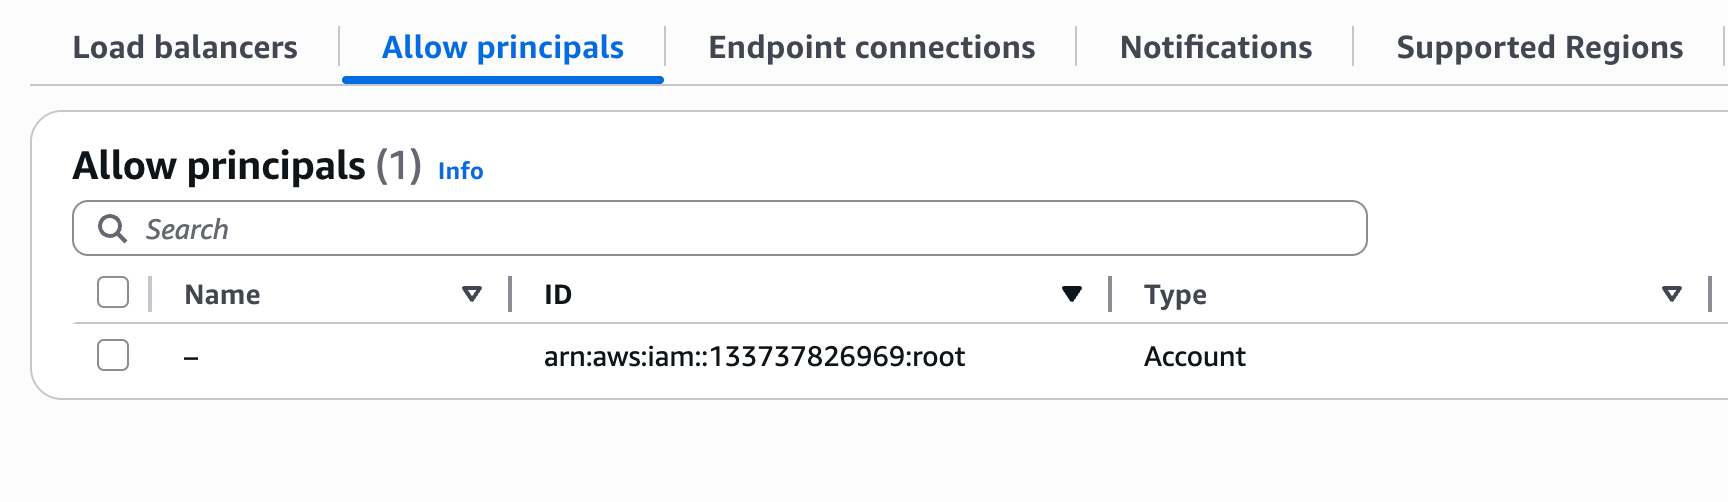
Step 6: Whitelist the PushMetrics AWS account
- In VPC → Endpoint services, select your endpoint service.
- Go to the Allow principals tab → Allow principals.
- Enter:
arn:aws:iam::133737826969:root
This allows the PushMetrics AWS account to create an endpoint connection to your service. It does not grant access to any of your other resources. The :root refers to the AWS account as a whole (not the root user), and the connection still requires your manual acceptance in a later step.
Step 7: Update the RDS Security Group
Add inbound rules to the security group attached to your RDS instance, allowing traffic from each private subnet used by the NLB:
| Type | Protocol | Port | Source |
|---|---|---|---|
| Custom TCP | TCP | 5432 | CIDR of each private subnet used by the NLB |
For example, if your NLB is deployed in three subnets with CIDRs 172.31.16.0/20, 172.31.32.0/20, and 172.31.0.0/20, add an inbound rule for each.
Step 8: Share the Service Name with PushMetrics
Send the VPC Endpoint Service name from Step 5 to your PushMetrics contact (e.g., via email or your account manager).
PushMetrics will create a VPC endpoint on our side, and you will receive a pending connection request.
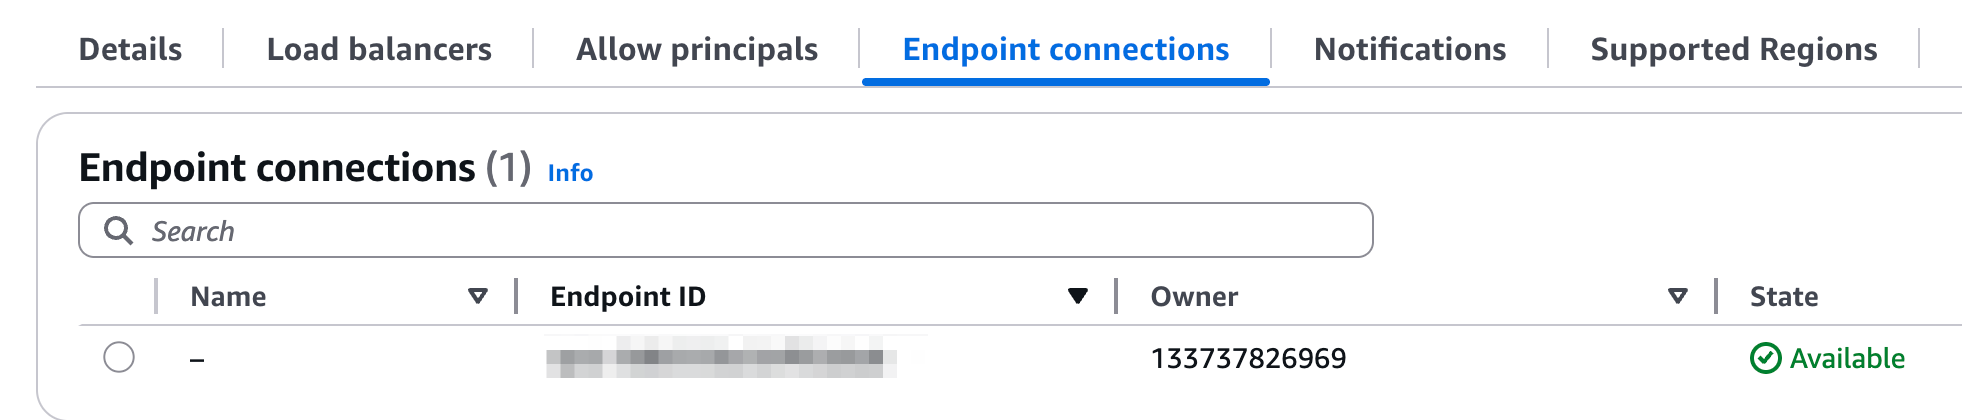
Step 9: Accept the PushMetrics connection
Once PushMetrics creates the endpoint, you will see a pending connection in:
VPC → Endpoint services → select your service → Endpoint connections
Select the pending connection and click Accept. After acceptance, the connection becomes active and PushMetrics can reach your database.
Step 10 (optional): Deploy a Lambda function for IP sync
If your RDS instance uses Multi-AZ deployment, the private IP address may change during a failover event. The NLB target group uses static IPs and will not automatically follow the DNS change.
To handle this, deploy a Lambda function that periodically resolves the RDS DNS endpoint and updates the NLB target group:
import os
import socket
import boto3

elbv2 = boto3.client('elbv2')

TG_ARN = os.environ['TARGET_GROUP_ARN']
RDS_ENDPOINT = os.environ['RDS_ENDPOINT']
RDS_PORT = int(os.environ['RDS_PORT'])

def handler(event, context):
    # Resolve current RDS IP
    addr_info = socket.getaddrinfo(RDS_ENDPOINT, RDS_PORT, socket.AF_INET)
    new_ips = {r[4][0] for r in addr_info}

    # Get currently registered targets
    resp = elbv2.describe_target_health(TargetGroupArn=TG_ARN)
    current_ips = {t['Target']['Id'] for t in resp['TargetHealthDescriptions']}

    # Update if changed
    for ip in (current_ips - new_ips):
        elbv2.deregister_targets(TargetGroupArn=TG_ARN,
            Targets=[{'Id': ip, 'Port': RDS_PORT}])
    for ip in (new_ips - current_ips):
        elbv2.register_targets(TargetGroupArn=TG_ARN,
            Targets=[{'Id': ip, 'Port': RDS_PORT}])
| Setting | Value |
|---|---|
| Runtime | Python 3.12 |
| VPC | Same VPC as the RDS instance (required for private DNS resolution) |
| Trigger | EventBridge scheduled rule — every 1 minute |
| IAM permissions | elasticloadbalancing:RegisterTargets, DeregisterTargets, DescribeTargetHealth |
| Environment variables | TARGET_GROUP_ARN, RDS_ENDPOINT, RDS_PORT |
For single-AZ RDS instances this step is optional, but recommended for production use.
What PushMetrics does on our side
After receiving your VPC Endpoint Service name, PushMetrics will:
- Create a VPC Interface Endpoint in our VPC pointing to your service.
- Wait for you to accept the connection (Step 9).
- Retrieve the PrivateLink endpoint DNS — this is a hostname generated by AWS that looks like:
This DNS name resolves to private IPs within the PushMetrics VPC and is used as the database host in PushMetrics. It is only accessible from within our VPC — it is not publicly reachable.vpce-xxxxxxxxx-xxxxxxxx.vpce-svc-xxxxxxxxx.eu-central-1.vpce.amazonaws.com - Test connectivity to your database over the PrivateLink connection.
- Configure the database connection in PushMetrics using the endpoint DNS as the host.
You do not need to share any database credentials until the PrivateLink connection is verified. Once connectivity is confirmed, you provide the database username, password, and database name through the PushMetrics application (encrypted at rest).
Estimated cost
The following AWS resources are created in your account:
| Component | Approximate monthly cost |
|---|---|
| Internal Network Load Balancer | ~$16 + data processing |
| Lambda function (optional, 1 invocation/minute) | < $1 |
PushMetrics covers the cost of the VPC Interface Endpoint on our side.
Summary checklist
- Gather RDS details (endpoint, port, VPC, subnets, security group)
- Resolve RDS private IP from within the VPC
- Create NLB Target Group (IP type, TCP, database port)
- Register RDS IP as a target
- Create Internal NLB with TCP listener forwarding to the target group
- Enable cross-zone load balancing on the NLB
- Create VPC Endpoint Service pointing to the NLB (with acceptance required)
- Copy the Service name from the Endpoint Service Details tab
- Whitelist PushMetrics account:
arn:aws:iam::133737826969:root - Update RDS security group to allow traffic from NLB subnets
- Share VPC Endpoint Service name with PushMetrics
- Accept the PushMetrics endpoint connection request
- (Optional) Deploy Lambda for automatic IP sync if using Multi-AZ
Related documentation
- PostgreSQL — Connecting a PostgreSQL database to PushMetrics.
- AWS: Access RDS across accounts using PrivateLink — AWS reference architecture.
- AWS: Create a service powered by PrivateLink — Official AWS documentation.